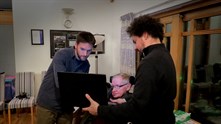
 Professor Stephen Hawking has famously lived with the neuron disorder ALS for more than 50 years. During that time, he’s developed myriad ways to interact with the world—from an artificial voice to a cheek-controlled switch that controls his computer and helps him write books. So why not stargazing?
At a recent scientific symposium in the Canary Islands, Hawking and his team approached Celestron in search of a telescope that he could operate via his computer to conduct astroimaging sessions. We jumped at the opportunity to develop such a system for him.
In brainstorming the setup, the Celestron team was delighted to discover that no new products or even software programming would need to be developed. While the configuration is customized, Hawking’s solution uses off-the-shelf equipment from Celestron and a handful of third-party manufacturers. This is great news for the astronomical community; it means that anyone confined to a wheelchair through ALS or another disability can replicate Hawking’s setup and enjoy the rewarding hobby of astronomy. See the FAQ below for more information on building your own setup.
Choosing the right telescope
 First, Celestron engineers clearly defined the project’s goal: build a system that allows Stephen Hawking to control the telescope remotely from the comfort of his home and view celestial images on his computer.
Professor Hawking intended to use the setup from his yard in Cambridge, but also occasionally transport it to darker locations to view the sky. The first piece of equipment to consider was the telescope itself. We selected a customer-favorite that can “do it all” while remaining portable, the CPC Deluxe 1100 HD. This telescope provides substantial light-gathering ability for bright, clear astroimages, but is manageable enough that one of Hawking’s assistants can easily assemble it.
The CPC Deluxe HD is a versatile solution. It allows Hawking to view everything from the Moon and planets to deep space objects including nebulae and distant galaxies:
- Planetary objects have very small angular diameters. Ample focal length and resolving power is needed. Otherwise, Jupiter may just look like a bright star on the screen. With 2800 mm of focal length, the CPC Deluxe 1100 HD provides detailed views.
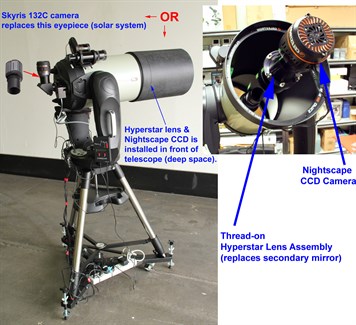
- Many popular deep space objects are very large and comparatively much fainter than solar system objects. A short focal length, wide field of view, and fast f-ratio are needed to view the entirety of the object in a matter of seconds. The CPC Deluxe HD can be easily converted from 2800 mm of focal length at f/10, to just 560 mm at f/2, thanks to Celestron’s Fastar removable secondary mirror. We’ve outfitted the telescope with Starizona’s HyperStar lens assembly to operate the telescope at f/2. An assistant can easily switch the telescope to the desired configuration.
Two cameras for two types of imaging
 Professor Hawking needs to view things through the telescope in hugely different ways. Visual observers may just change the eyepiece if going from Mars to the Pleiades cluster. But astroimagers typically dedicate a whole telescope and camera system to just one type of imaging.
- Small, bright solar system objects require high magnification and a narrow field of view.
- Large, faint deep sky objects require low power and a wide field of view.
Given these vast differences in image scale, one astronomical camera cannot image both types of targets. A single camera solution would severely compromise either the resolution for planetary images, or the field of view for deep space images. Additionally, most cameras do not have the sensitivity range that makes them suitable for both uses. (Some DSLRs have a sufficient range, but do not solve the image scale problem.) Because of this, we selected two different, interchangeable cameras.
We wanted to provide Hawking with a “live” image on the computer screen. For solar system objects, we chose the Skyris 132C—a color camera—to display true color in images without the need for processing. With USB 3.0 speeds, Skyris can stream high-speed video of objects like Jupiter, Saturn, Mars, and the Moon.
For deep sky targets, streaming images becomes much more of a challenge. Today’s cameras are sensitive enough to view live images of deep space objects, but still generally use smaller sensor sizes, limiting the field of view.
Instead, we chose a traditional CCD camera, our Nightscape 8300. While there is a delay of a few seconds and deep sky images aren’t truly “live,” this camera allows Hawking to capture longer exposures, giving him the option to create higher-quality images he can share with others.
There’s a lot going on here, but simplicity and portability are still key
Hawking and his team are new to operating a telescope and have very busy schedules. They needed a turnkey system that is quick to set up and delivers great results with minimal hassle.
 The telescope is stored indoors and must be carried outside (with the help of JMI’s Tripod Wheely Bars) by an assistant. The telescope is not permanently mounted, and the system is not dedicated to long exposure astrophotography, so we simplified the setup to require the least amount of user input possible:
- Because we selected the CPC Deluxe HD with its altazimuth fork mount, we avoided the need for equatorial tracking—no wedge and no polar alignment required!
- We did not include an instrument rotator or autoguider in the setup.
But perhaps the biggest time-saver was the StarSense AutoAlign accessory. This is huge! After the scope is wheeled outside, the assistant flips on the power switch and presses the Align button. The telescope then self-aligns and Hawking can take over on his PC.
What’s more, the CPC Deluxe HD’s built-in GPS combined with StarSense eliminates the need to worry about the observing location, time zones, or what parts of the sky are visible. If skies are heavily obstructed by trees or buildings, as they are in Hawking’s backyard, the assistant selects StarSense’s “User Auto Align” feature, which is trained to automatically select clear areas of sky.
Everything must be controlled remotely from Hawking’s PC

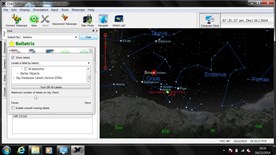
Hawking's computer and another one connected to the telescope outside communicate via his home WiFi network using TeamViewer on his PC. Once automatically aligned with StarSense, the telescope points and tracks through the PC using TheSkyX Pro software.
To slew to an object, Hawking types its name into a simplified interface using his cheek-controlled switch. The computer and software are also controlling a motorized focuser and the imaging camera.
Frequently Asked Questions
How much does this setup cost?
The entire system retails for just under $10,000. This includes all the needed software and cabling.
Why not use a Mallincam or video deep space imager instead of a Nightscape or Skyris?
The sensor size would still limit our field of view when imaging deep space objects. The Nightscape 8300 CCD camera can potentially go deeper by extending the exposure time. The resolution is also ample enough to share detailed images online or make prints if desired.
Are the images really live on the screen?
Images captured with Skyris are displayed instantly. Images captured with Nightscape 8300 take several seconds to display, depending on the exposure time. The CCD needs to accumulate light over a few seconds to provide a color image of a deep space object. The result is more color and detail than would be possible looking through an eyepiece, either from dark skies or light polluted cities.
Could you save size and cost by using a small, wide-field refractor?
The 11-inch aperture works to provide the image scale at f/10 to view the planets, and more light to the camera when switched to f/2 to view deep sky. A smaller wide-field telescope would not accomplish both sufficiently.
Why did you use a separate computer instead of linking directly to Hawking’s PC?
There are two main reasons for this:
- We wanted a dedicated computer to accommodate all of the software, drivers, and cabling to the telescope. This isolates Hawking’s PC from USB and serial connections, unexpected connection failures, and power outages. The CPC Deluxe HD can be controlled via WiFi, but we also need a PC to control the motorized focuser and camera.
- Wirelessly connecting to the second PC via TeamViewer gives Hawking mobility. He’s not tethered to cables, can image in the comfort and warmth of his home. Plus, he has the convenience of switching out of the TeamViewer screen instantly without closing programs or disconnecting from anything. It seems that Hawking enjoys this flexibility; indeed, he was capturing celestial images while having dinner in his dining room!
Can I build a setup like this at home?
Absolutely. All items purchased are readily available from Celestron, Starizona, Software Bisque, and other manufacturers. If you do create a similar setup, please share it with us on our social media channels!
Equipment List
- Celestron CPC Deluxe 1100 HD
- Celestron StarSense AutoAlign
- Celestron Nightscape 8300 CCD Camera
- StarLight Instruments Feather Touch Micro Focuser
- Starizona MicroTouch Focuser
- Starizona HyperStar
- Celestron Skyris 132C Camera
- AstroZap Dew Shield and Heater
- Celestron 12VDC 5A
- Celestron 12VDC 2.5A
- UpBright 12VDC 10A with DC Lighter Socket
- VCT 6 Port UK/EU/US Power Strip
- Rosewill 4 Port USB Hub
- JMI Heavy Duty Medium Sized Wheely Bars
- Dell Inspiron i3542 laptop with Windows 7
- Tripp Lite USB Serial Adapter
- Celestron RS-232 PC Cable
- Software Bisque’s TheSkyX Pro with Camera Control Plugin
- Diffraction Limited’s MaxIm DL 6
- TeamViewer
