
To get the best performance from your Schmidt-Cassegrain (SCT) or EdgeHD telescope, its optics must be collimated—properly aligned within the telescope. Your telescope was collimated at the factory when it was assembled, and its collimation was QA-checked before it was shipped. However, if the telescope has been dropped or jarred during transport or has undergone considerable temperature changes, it may need to be re-collimated. You can achieve correct collimation by adjusting the tilt of the secondary mirror housed at the center of the Schmidt corrector (see Figure 1). This is the only adjustment available to the end user and should be the only adjustment required to bring the telescope’s optics into excellent collimation.
NOTE: Do not attempt to make adjustments to the Schmidt corrector’s orientation or positioning. Doing so will likely degrade collimation and optical performance and may require return to Celestron to achieve proper optical alignment.


CHECKING COLLIMATION – HOW DO I KNOW IF MY OPTICS NEED ADJUSTMENT?
Checking optical collimation is quick and easy. We recommend taking a few moments to check collimation before each observing session. To do this, you’ll need to examine a star image through the telescope’s eyepiece.
- To begin, set up your telescope as you normally would for an observing session. Connect a higher power eyepiece (ideally, 10mm focal length or less). Before you begin, be sure that your telescope is in thermal equilibrium with its surroundings. Allow 45 minutes for the telescope to reach equilibrium if you move it between large temperature extremes, like from a heated car or house into the cold night air.
- Choose a star at least 20 degrees above the horizon to minimize the effect of atmospheric seeing conditions and slew the telescope to it. Center the star in the field of view.
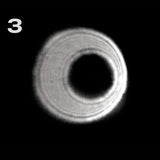
- Defocus the telescope by about one turn of the focus knob until the star image appears doughnut shaped. There will be brighter rings of light surrounded by a dark hole (i.e. the shadow from the secondary obstruction) in the center (see Figure 2). If the telescope is collimated, the hole should appear centered relative to the rings. If the hole is not centered, then adjustment to the collimation is needed (see Figure 3).
- Next, check the other side of focus by reversing direction of the focus knob so that the centered star is focused and then defocused again. The hole should still be centered in the rings. If it isn’t, some collimation adjustment is needed.
If you are unsure if the telescope needs adjustment or not, the collimation is likely OK. In this case, it’s best not to make any adjustments, as doing so can easily make the collimation worse, not better.
COLLIMATION SETUP
As you did when checking collimation, make sure your system is acclimatized to the outside temperature before you begin the collimation process.
To collimate your SCT or EdgeHD, you will need a pinpoint light source. A bright star works great. A bright star near the zenith is ideal since there is minimal atmospheric distortion in that part of the sky. Make sure that your mount’s tracking is turned on, so the star won’t drift as you are making collimation adjustments. Or, if you are using a roughly polar aligned equatorial mount and you do not want to power up your telescope, you can choose Polaris as your collimation star. Its position relative to the celestial pole means that it moves very little, eliminating the need to track it.
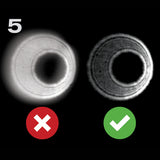
If seeing conditions (i.e. air steadiness) are turbulent, collimation will be difficult to judge (see Figure 4). This is because the extra-focal diffraction patterns that need to be evaluated will be smeared and blurred. Wait until a better night if it is turbulent or aim to a steadier part of the sky. Look for a part of the sky with steady—not twinkling—stars. If stars are twinkling, then conditions are poor, and it may be hard to achieve proper collimation. If seeing conditions are good (see Figure 5), you can use a high-powered eyepiece (i.e. focal length less than 10mm) to achieve the most precise optical alignment. If seeing conditions are ideal, use an eyepiece with even more magnification (i.e. focal length between 2.3mm and 7mm) for the best results.
Next, if you have one attached, remove the dew shield from your telescope. This will provide best access to the collimation screws.
NOTE: If you are outside in heavy dew conditions when attempting to collimate, you may need to consider using an optional dew heater system; this will prevent dew from forming on the Schmidt corrector while you adjust collimation. When connecting the eyepiece to the telescope, make sure all thumbscrews are firmly tightened, as this helps ensure the eyepiece is best mechanically aligned with the optical axis. Also, make sure the retaining ring that connects the visual back to the rear cell of the telescope is securely tightened. If you will be subsequently using the telescope for imaging with a camera, consider collimating the telescope with the eyepiece inserted directly into the visual back, without a diagonal in place. Doing so will remove any source of alignment error which may arise from the diagonal itself.
After making each collimation adjustment, you will need to re-center the bright star in the eyepiece. If using a computerized mount, you should use your telescope’s hand control to move the telescope (use a slow speed rate) and re-center the star. So, make sure the hand control is in a handy location nearby.
COLLIMATION PROCESS
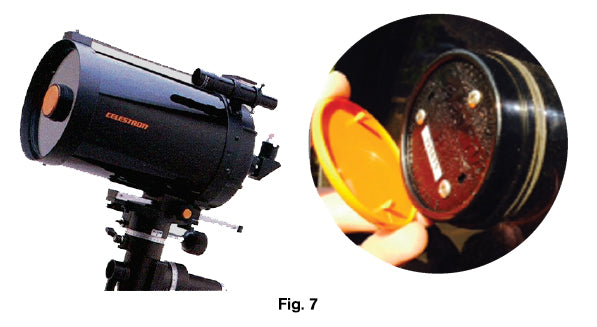
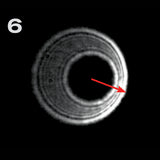
To collimate your telescope, you’ll use a Phillips-head screwdriver to make adjustments to the collimation screws on the back of the secondary mirror assembly. These three screws are clearly visible when looking at the front of most telescopes (see Figure 6).

Some older SCT telescopes have an orange cap that covers the collimation screws (see Figure 7). Carefully use a fl at-head instrument or other tool to pry the cap off. There are a couple of tabs on the plastic cap that connect it to the rear of the secondary mirror assembly. Once the cover is removed, it’s easy to see and access the three collimation screws.
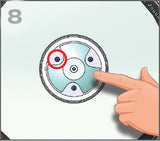
There are three collimation screws; each can be adjusted to change the tilt of the secondary mirror. All three screws provide a “tip/tilt” adjustment system, if you loosen one screw, then the other two screws should be tightened. Conversely, if you tighten one screw, then the other two screws should be slightly loosened (see Figure 8). In practice, since each screw will only be loosened or tightened by a very small amount at a time, it is not necessary to adjust all three screws at once, as there is some flex in the mechanical assembly. However, if you do tighten (or loosen) one of the screws by a significant amount, then the other two screws will need to be loosened (or tightened) at some point in order to provide the proper screw tension.
WARNING: When using the screwdriver to make adjustments to the collimation screws, stay focused and be careful not to inadvertently scratch the Schmidt corrector. Use a red-light flashlight, if needed, to illuminate the collimation screws so you can make sure you put the screwdriver tip in the head of the intended screw.
The goal of making adjustments to the collimation screws is to center the central shadow (i.e. the hole) in the defocused star image. Make only small 1/10th-of-a-turn adjustments at most to each of the collimation screws.

Be sure to re-center the star in the eyepiece’s field of view by moving the telescope on its mount after making any adjustments to the collimation screws. If the star is not centered in the field of view, interpretation of the defocused star images will not be accurate to determine proper collimation. As discussed previously, using shorter focal length eyepieces will increase magnification and improve the centering precision of the star within the field of view of the eyepiece.
To collimate the SCT or EdgeHD, follow these steps:
 |
1. Center the bright star in the eyepiece’s field of view. Insert the highest power eyepiece that can be used with good results under current seeing conditions. |
 |
2. Defocus the star until you can see a dark “hole” in the center (i.e. the shadow of the secondary mirror) and 2-4 diffraction rings of light around it. If you defocus the star too much, it may be difficult to determine precise collimation, and it will also become dimmer and harder to see. If you defocus the star too little, you won’t be able to distinctly see the hole and rings. |
 |
3. Inspect the out-of-focus (“extra-focal”) diffraction pattern. |
 |
4. Next, turn the focus knob in the opposite direction. This will cause the image to pass through focus and become defocused on the other side of focus. Again, defocus the |
 |
5. Inspect the extra-focal diffraction pattern on the other side of focus to see if one side of focus provides a slightly better appearance of the light and dark diffraction rings. Whichever side of focus has clearer light and dark diffraction rings should be used for collimation purposes. |
 |
6. Make sure the star is still centered in the eyepiece’s field of view. Note the direction in which the central shadow and the diffraction inner bright ring are skewed relative to the bright outer diffraction ring. |
 |
7. Place your finger along the edge of the front cell of the telescope pointing towards the collimation screws, taking care not to touch the Schmidt corrector. The shadow of your finger should be visible when looking at the extra-focal diffraction pattern in the eyepiece. Rotate your finger around the tube edge until its shadow is closest to the narrowest portion of the rings (i.e. the same direction in which the central shadow is skewed). |
 |
8. Locate the collimation screw closest to where your finger is pointing. This is the collimation screw you should adjust first. If your finger is pointing exactly between two collimation screws, adjust the one that is further away from your finger. |
 |
9. Use the screwdriver to turn the collimation screw identified in Step 8. Very slightly tighten the screw. Usually, 1/10th of a turn of the screw is enough to notice a change in collimation. Then, look in the eyepiece and re-center the star in the field of view by moving the telescope mount. Use a slow speed rate to do this, as the field of view will be quite narrow. |
|
|
10. Confirm that the diffraction pattern’s central shadow and inner bright ring have moved closer to the center relative to the bright outer ring. |
|
11. If the central shadow and inner ring are still not centered relative to the outer ring when centered in the field of view, you will need to make adjustments to one of the other collimation screws. Go back to Step 6 and repeat the process. This time, you will make adjustments to a different collimation screw. |


Proper Collimation
You have achieved proper collimation when the central shadow and the bright inner diffraction ring are concentric with the bright outer diffraction ring, and the thin concentric dark ring (in between these two bright rings) extinguishes uniformly and simultaneously as you slowly pass through focus (see Figure 9). Proper collimation yields a star image diffraction pattern that is concentrically similar just inside and outside of focus. In addition, proper collimation delivers the optimal optical performance specifications that your telescope is built to achieve.

WARNING: If you cannot collimate your SCT or EdgeHD using the collimation screws, do not attempt to make any other adjustments to the optics or mechanics of the telescope! Doing so will not only likely put your telescope further out of alignment, it will also void your warranty. Instead, contact Celestron Technical Support by submitting a ticket here: celestron.com/pages/technical-support. Your telescope may need to be returned to Celestron for warranty evaluation (or paid repair, if the warranty has expired).
CONCLUSION
Collimating your telescope is an important part of ensuring its best performance and best images. While you should quickly check your telescope’s collimation before each observing session, it is unlikely that collimation adjustments will
be required on a regular basis. The exception would be in cases when the telescope is transported and not well-secured during a bumpy ride.
Collimation is not necessarily difficult to do but requires some learning and some patience. After adjusting your telescope’s collimation a few times, you’ll get the hang of it. The process will become easier and less time-consuming. Good luck and clear skies!